

Deploying Services
Launch new cloud services from templates, Docker images, or Git repositories
Deploy production-ready services to CloudStation with just a few clicks. Whether you're launching a database, deploying your application, or setting up infrastructure, CloudStation makes it simple.
Getting Started
Navigate to your Project in the CloudStation dashboard
Click the Instances tab
Click Add Service or the + icon to open the deployment menu
Deployment Methods
CloudStation offers three ways to deploy services, each optimized for different use cases.
From Templates (Recommended for Beginners)
The fastest way to get started. CloudStation provides pre-configured templates for popular services:
Databases
- PostgreSQL
- MySQL
- MongoDB
- Redis
- Elasticsearch
Applications
- Node.js apps
- Python apps
- PHP apps
- Static sites
Infrastructure
- Message queues (RabbitMQ, Kafka)
- Cache servers
- Monitoring tools
Templates come with production-ready defaults, including proper resource allocation, health checks, and security settings. They're perfect for getting started quickly without deep infrastructure knowledge.
Deploying from a Template
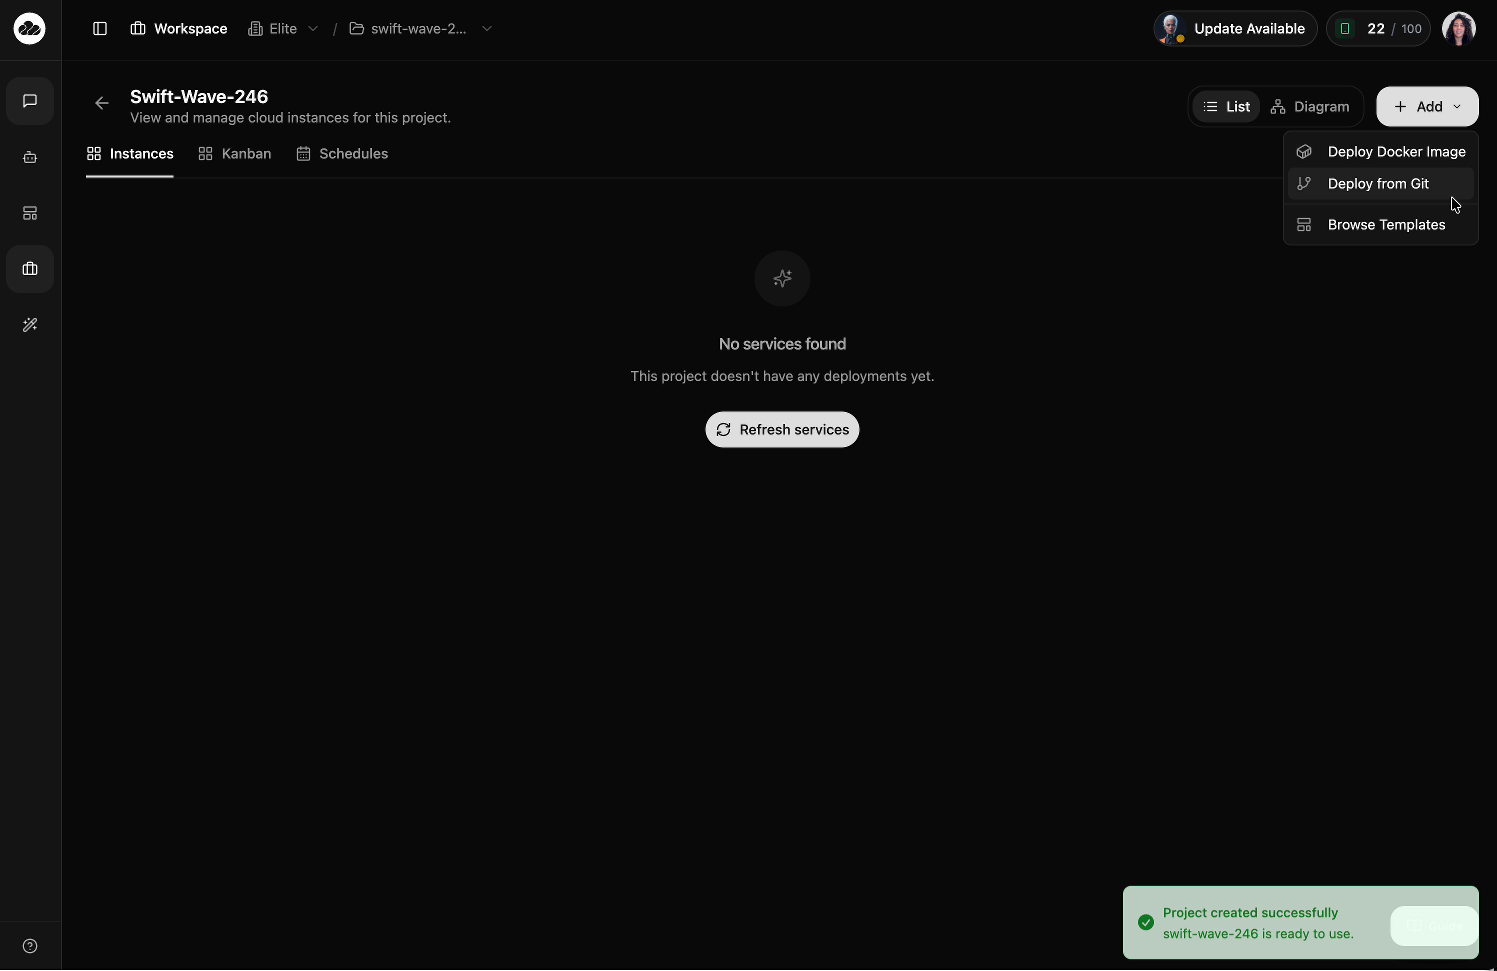
Click the + Add button in the top right of your project, then select Browse Templates from the dropdown menu.
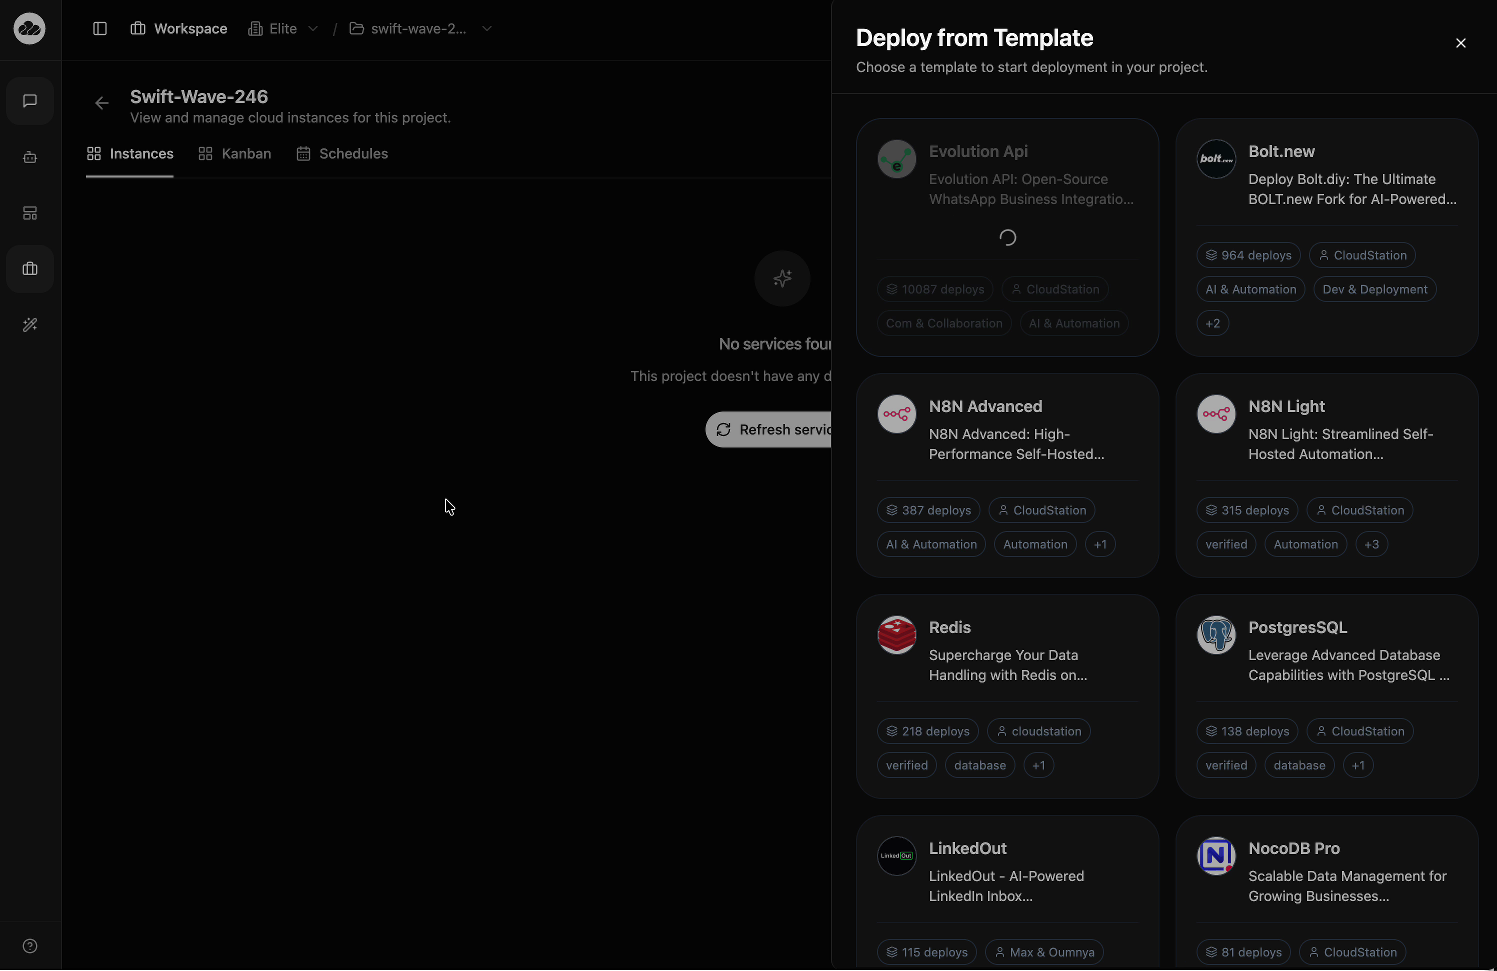
The Deploy from Template drawer opens, showing all available templates with deploy counts, tags, and categories. Browse or search for the service you need.
Click a template card to deploy it. CloudStation automatically provisions all required services (e.g., Evolution API deploys with Redis and Postgres).
A "Template deployed successfully" notification confirms deployment. Your services appear in the Instances list, initially showing PENDING status as they start up.
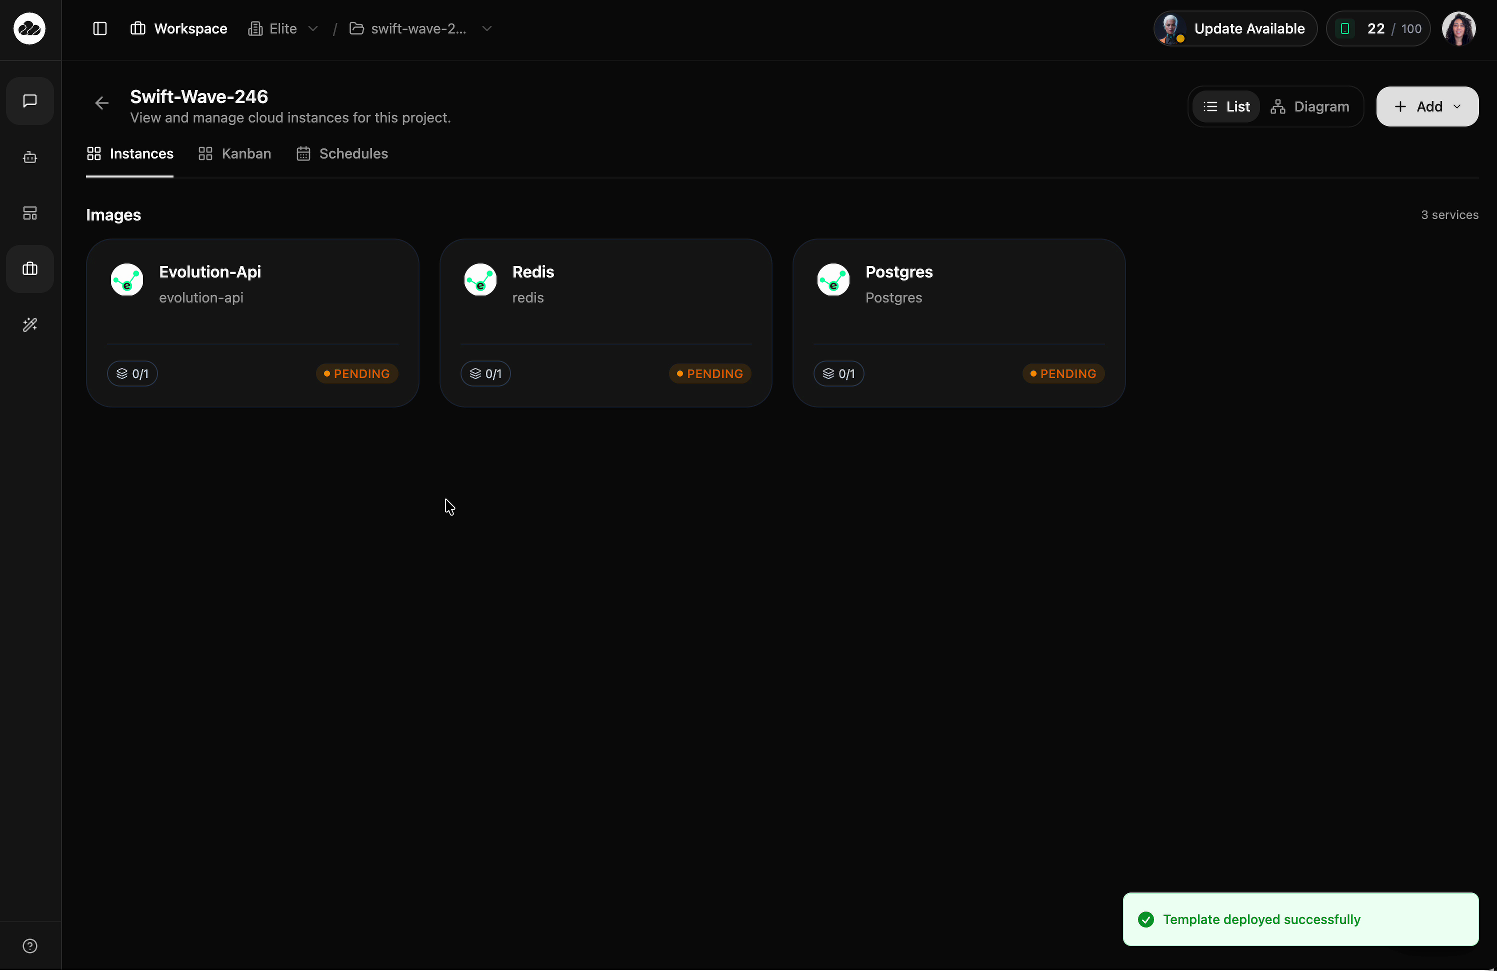
Watch your services transition from PENDING → STARTING → RUNNING. Most services are fully operational within 60 seconds.
From Docker Images
Deploy any Docker image from Docker Hub or private registries. Perfect for custom applications or services not in the template library.
Click Add Service → Docker Image
Enter the image name (e.g., nginx:latest or myregistry/myapp:v1.0)
Configure authentication if using a private registry
Set resource allocation and environment variables
Click Deploy to launch
CloudStation supports images from any Docker-compatible registry, including Docker Hub, GitHub Container Registry, Google Container Registry, and private registries.
From Git Repositories
Deploy directly from your source code. CloudStation automatically builds and deploys your application whenever you push changes.
Before deploying from Git, you must connect your GitHub account in Settings > Integrations. This is a one-time setup. See GitHub Integration for the full walkthrough.
Deploying from a Git Repository
Click the + Add button in the top right of your project, then select Deploy from Git from the dropdown menu. The Deploy from Git drawer opens with two tabs: URL (paste a repository link directly) and Browse Repos (browse your connected GitHub repositories).
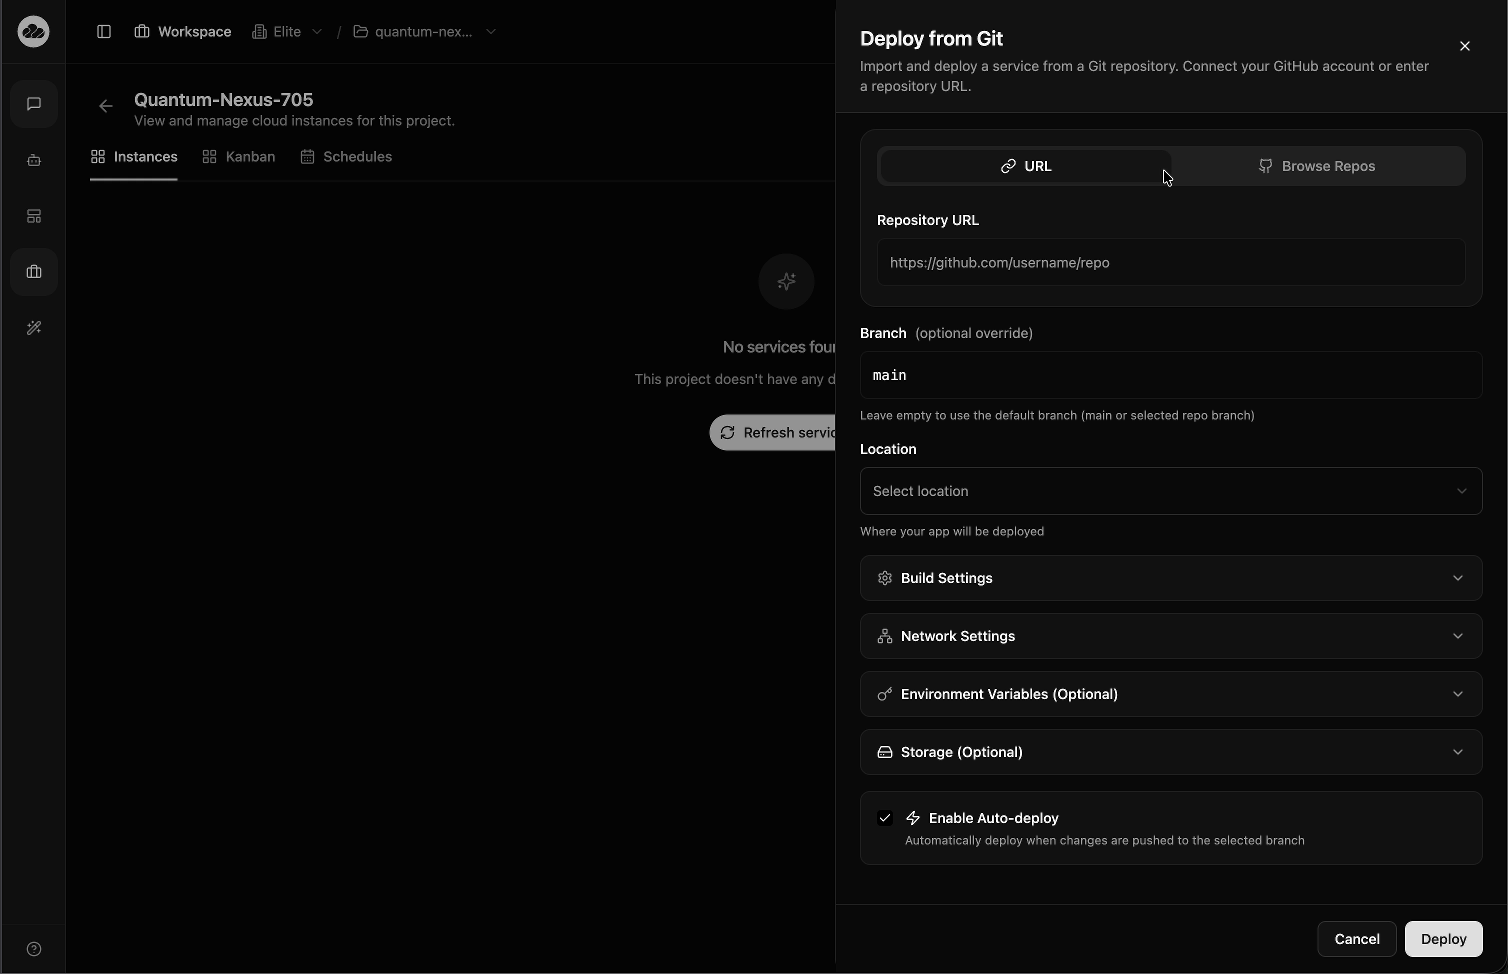
Choose your repository. Switch to the Browse Repos tab to see all your connected repositories. Select the repository you want to deploy — CloudStation shows the language, default branch, and last update time for each repo. The Branch field auto-fills with the repository's default branch (e.g., master or main).
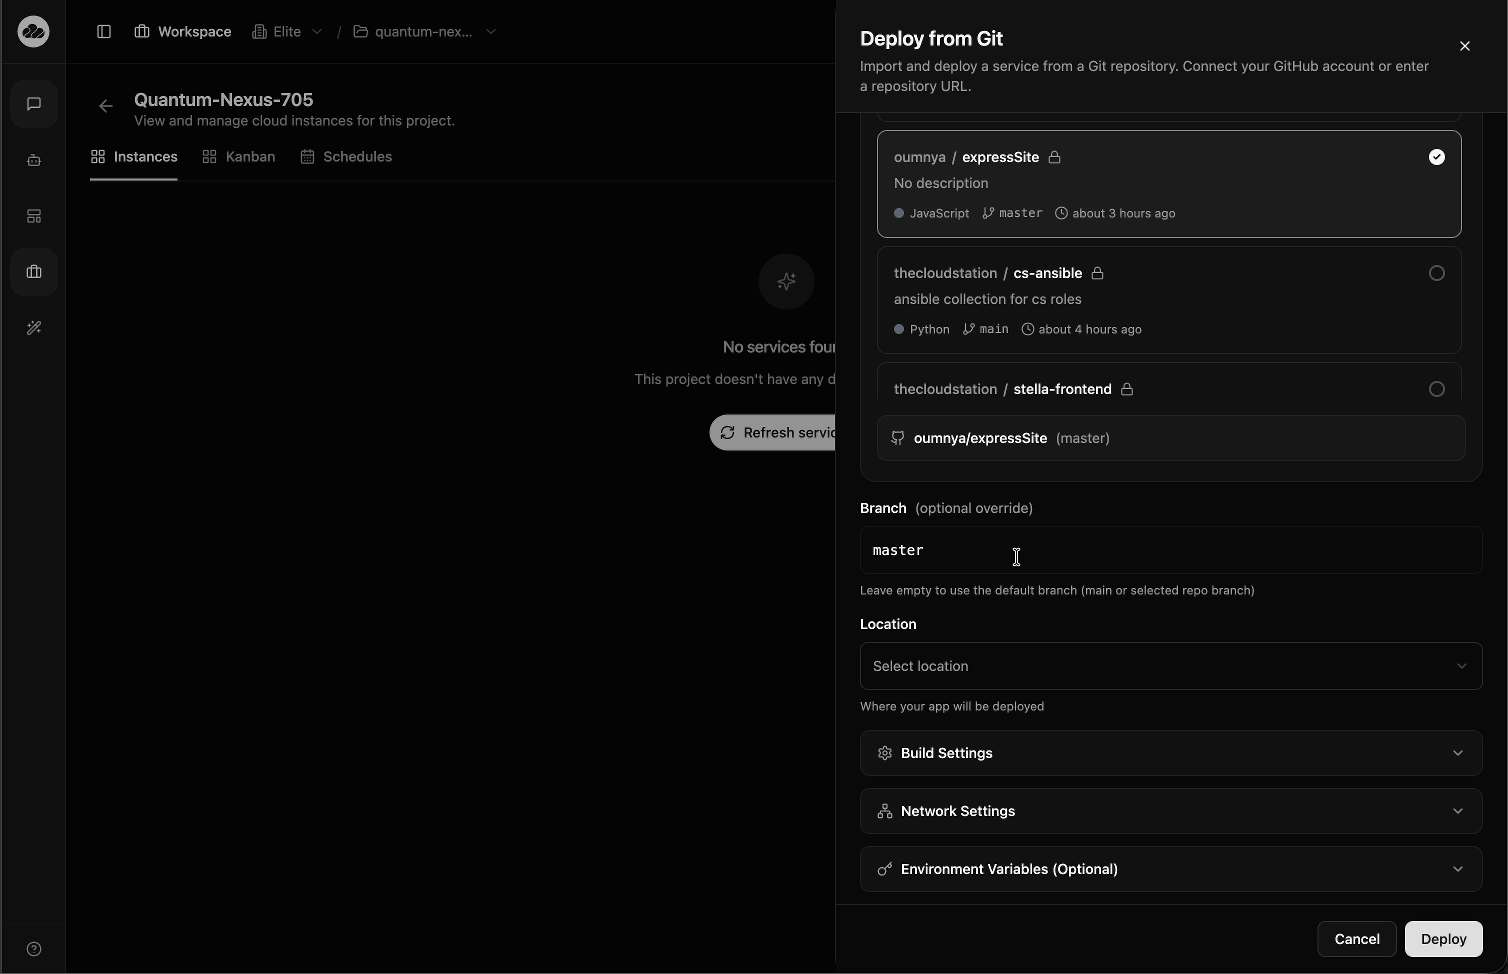
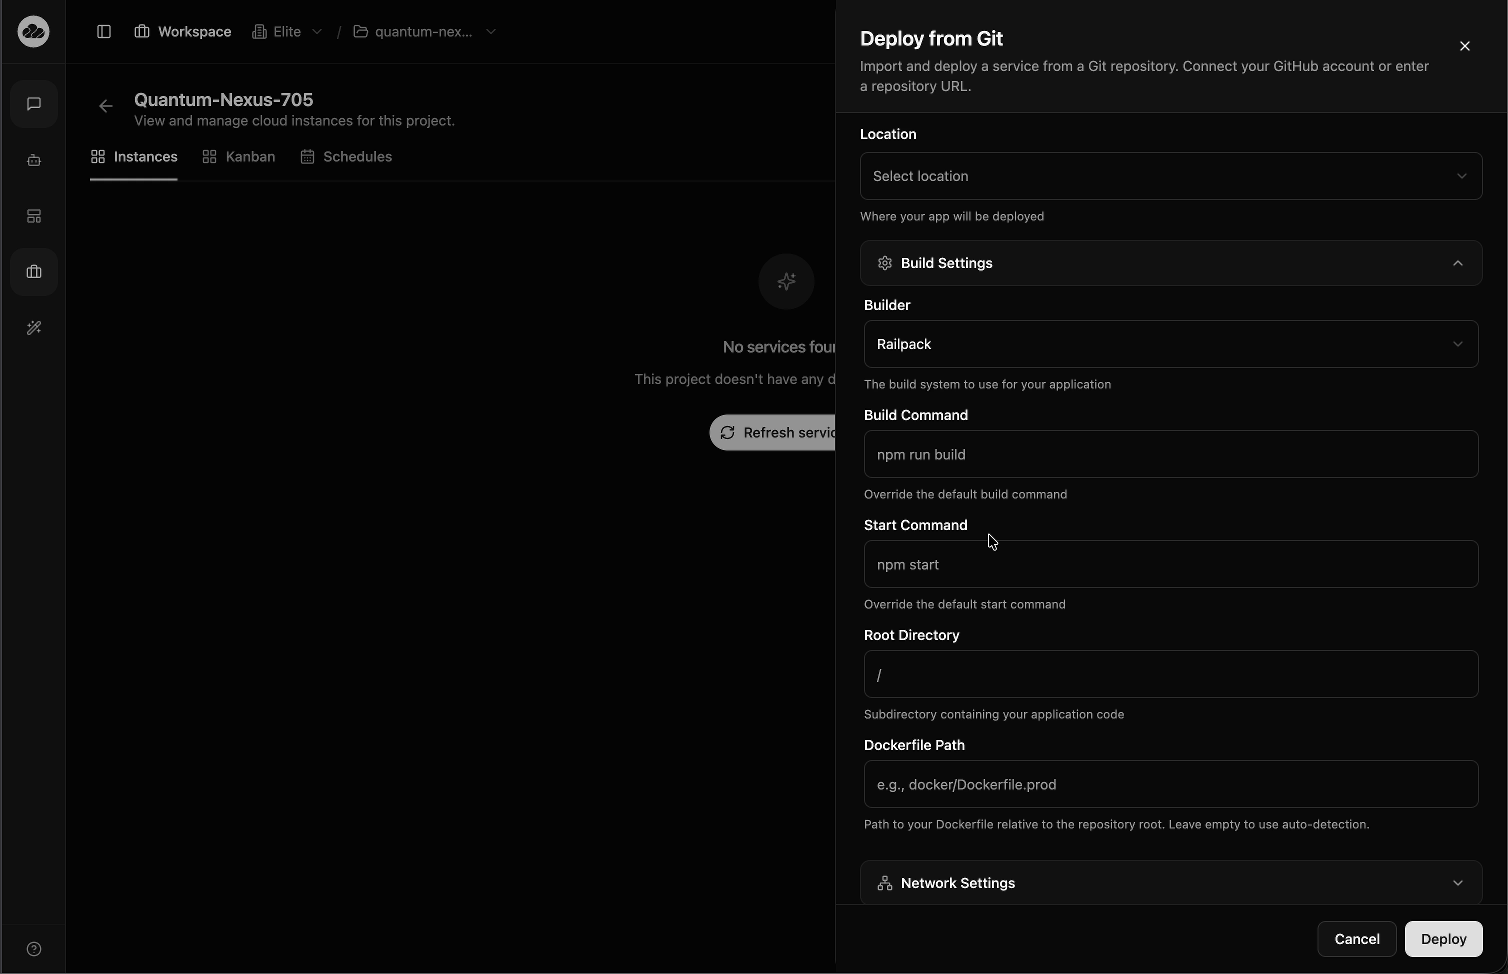
Configure Build Settings. Expand the Build Settings section to customize how your app is built. CloudStation auto-detects your framework and pre-fills sensible defaults:
- Builder: Choose between Railpack (recommended), Docker, or Nixpacks
- Build Command: Override the default build command (e.g.,
npm run build) - Start Command: Override the default start command (e.g.,
npm start) - Root Directory: Set a subdirectory if your app isn't at the repo root
- Dockerfile Path: Specify a custom Dockerfile path if needed
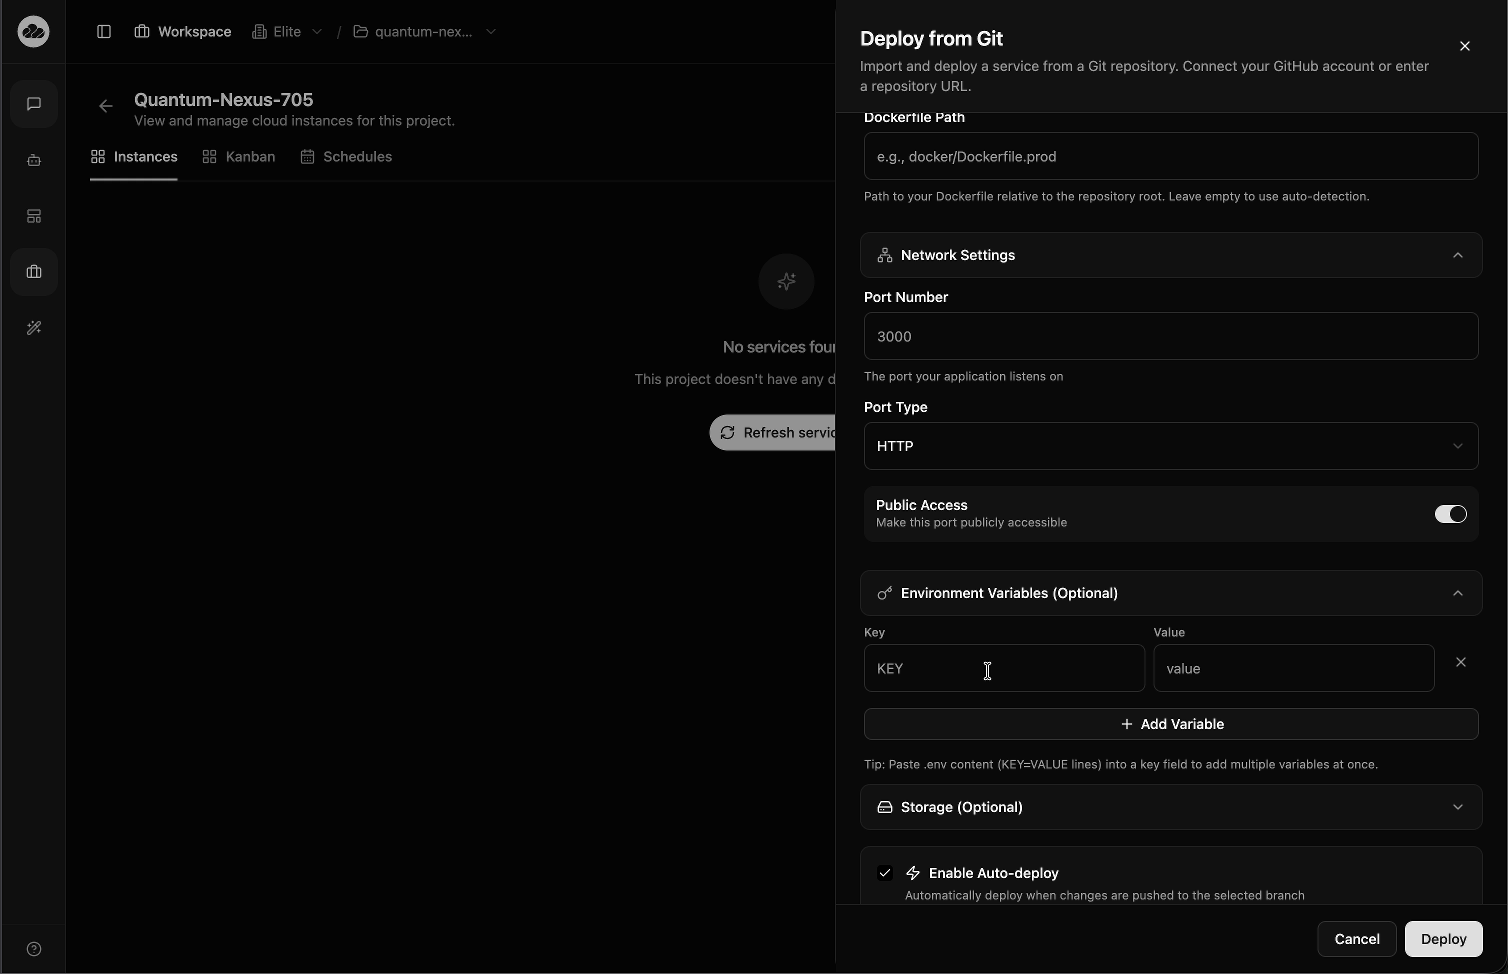
Configure Network Settings. Expand the Network Settings section to set up how your service is accessed:
- Port Number: The port your application listens on (e.g.,
3000for Express/Node.js apps) - Port Type: HTTP or TCP
- Public Access: Toggle on to make your service publicly accessible on the internet
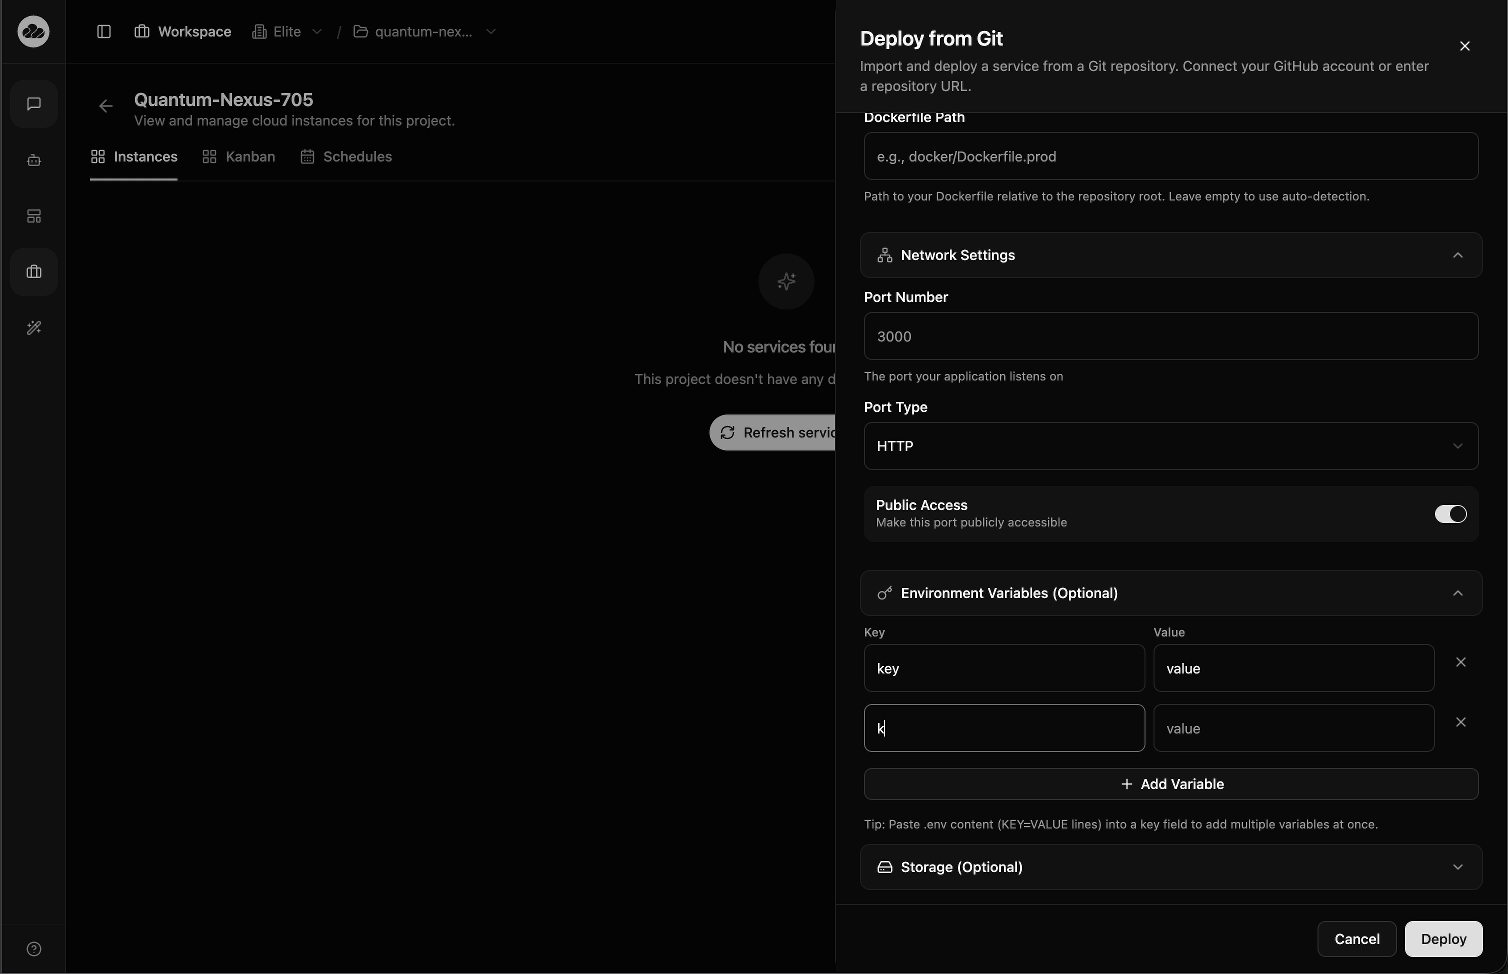
Add Environment Variables (Optional). Expand the Environment Variables section to add key-value pairs your app needs. Click + Add Variable to add more entries. You can also paste .env content (KEY=VALUE lines) directly into a key field to bulk-import variables.
Add Storage (Optional). If your app needs persistent data, expand the Storage section and configure a volume with capacity (in GB) and mount path (e.g., /data).
The Enable Auto-deploy checkbox at the bottom automatically redeploys your service whenever you push changes to the selected branch.
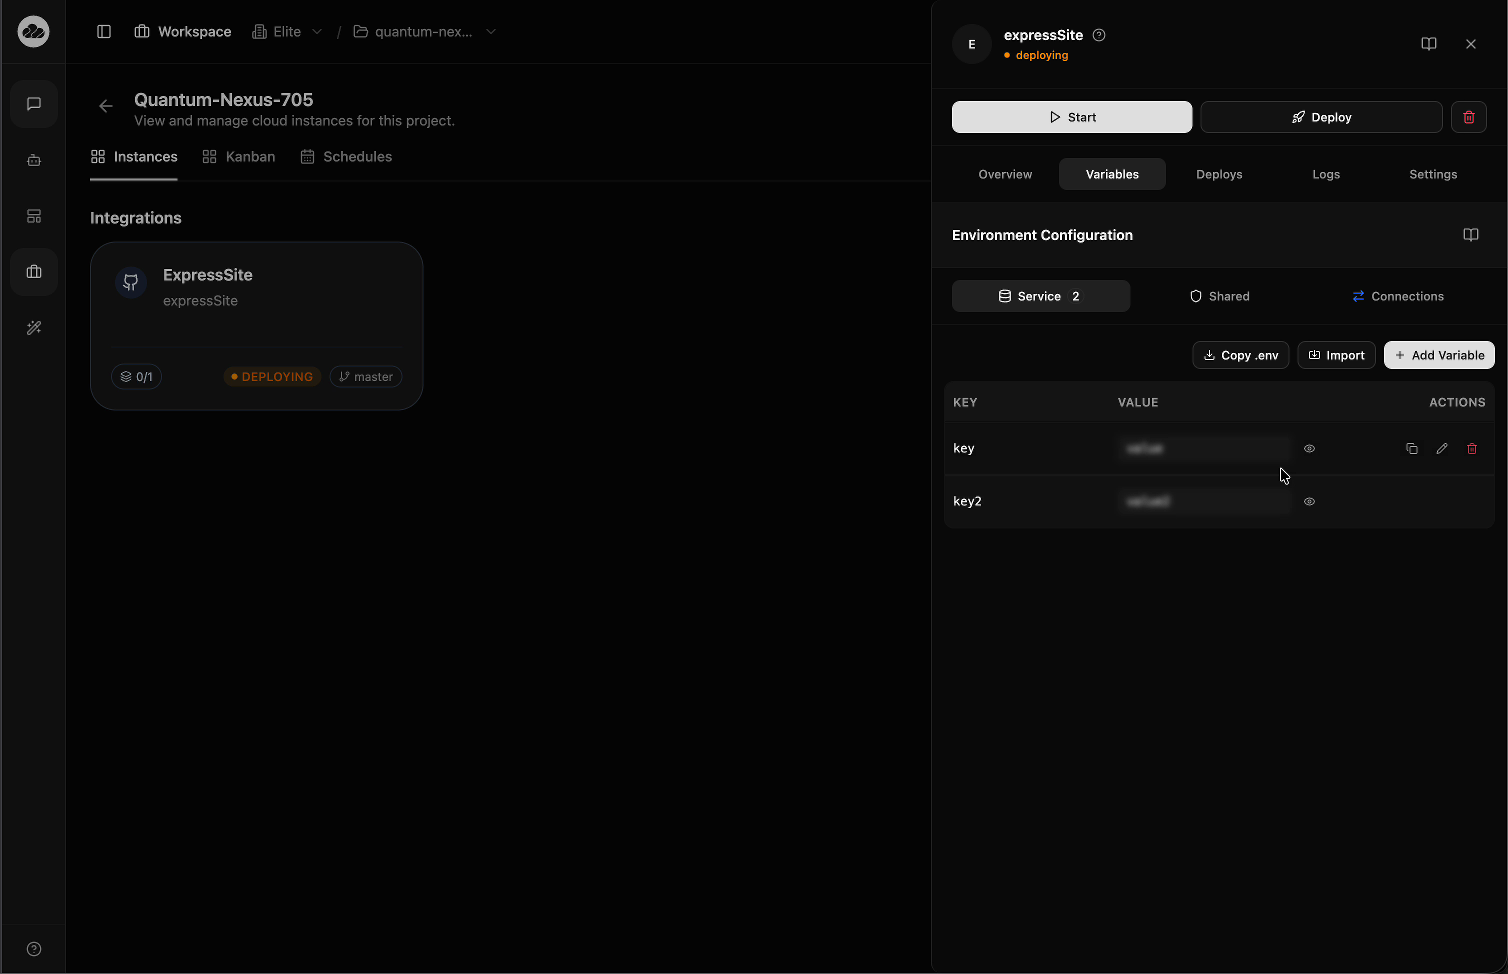
Click Deploy to start the build. A "Repository imported and deployed successfully" notification confirms deployment. Your service appears in the Integrations section of the Instances list with a DEPLOYING status badge.
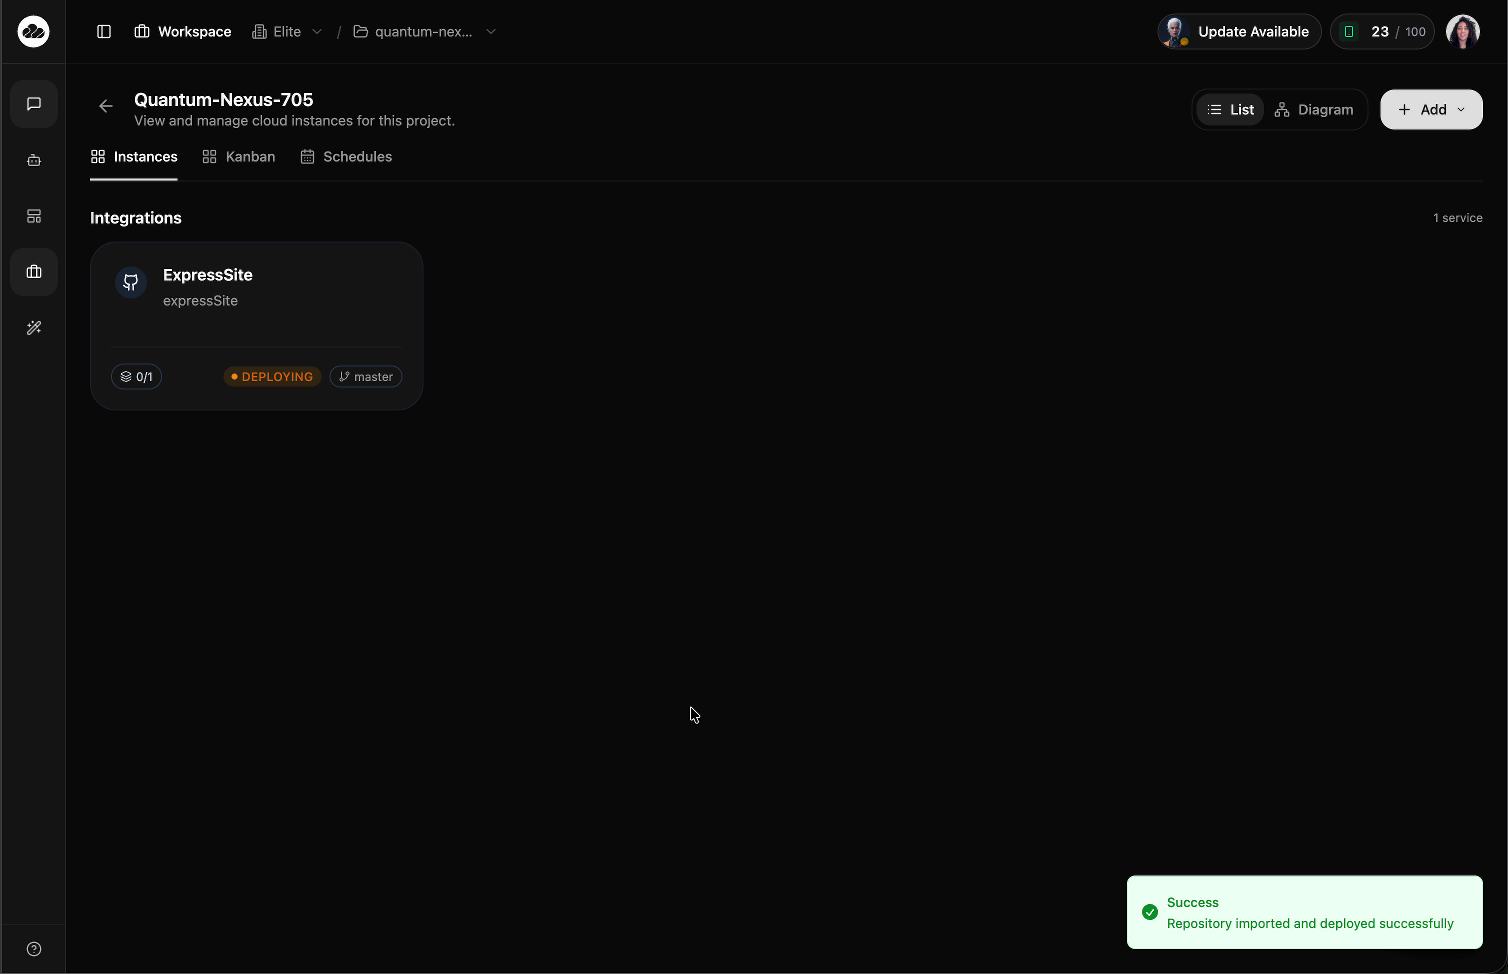
CloudStation automatically detects popular frameworks like Next.js, React, Vue, Django, Flask, Express, and more. Most deployments require zero configuration — just select your repo and click Deploy.
Resource Allocation
Every instance needs computing resources to run. CloudStation makes it easy to allocate the right amount.
RAM (Memory)
Choose how much memory your service needs:
- 512 MB: Lightweight services, simple APIs
- 1 GB: Small databases, standard web apps
- 2 GB: Medium apps, busy databases
- 4 GB+: Large applications, data processing
Start with lower resources and scale up if needed. CloudStation makes it easy to adjust resources later without downtime.
CPU
Allocate processing power:
- 0.5 vCPU: Background jobs, light workloads
- 1 vCPU: Standard applications
- 2 vCPU: Compute-intensive tasks
- 4 vCPU+: High-performance needs
Storage
Set disk space for your instance:
- Application storage: Built-in with every instance
- Persistent volumes: For databases and file storage (see Volumes)
Network Configuration
Ports
Expose your service to the internet or other services:
- Public ports: Accessible from anywhere (e.g., port 80 for web traffic)
- Private ports: Only accessible by other services in your project
- Auto-detection: CloudStation suggests common ports based on your image
Typical web application setup:
- Port 80 (HTTP) - Public
- Port 443 (HTTPS) - Public
- Auto-SSL certificate included
Typical database setup:
- Port 5432 (PostgreSQL) - Private only
- Port 3306 (MySQL) - Private only
- No public internet access for security
Typical API setup:
- Port 8080 (API) - Public with rate limiting
- Port 9090 (Metrics) - Private only
Subdomains
Every deployed service with public access gets an auto-generated subdomain on usecloudstation.com. You can view and customize it from the Overview tab in the instance detail panel.
Click your deployed service to open the detail panel. The Overview tab shows your App URLs section with the auto-generated subdomain, along with Verified, SSL, and active badges.
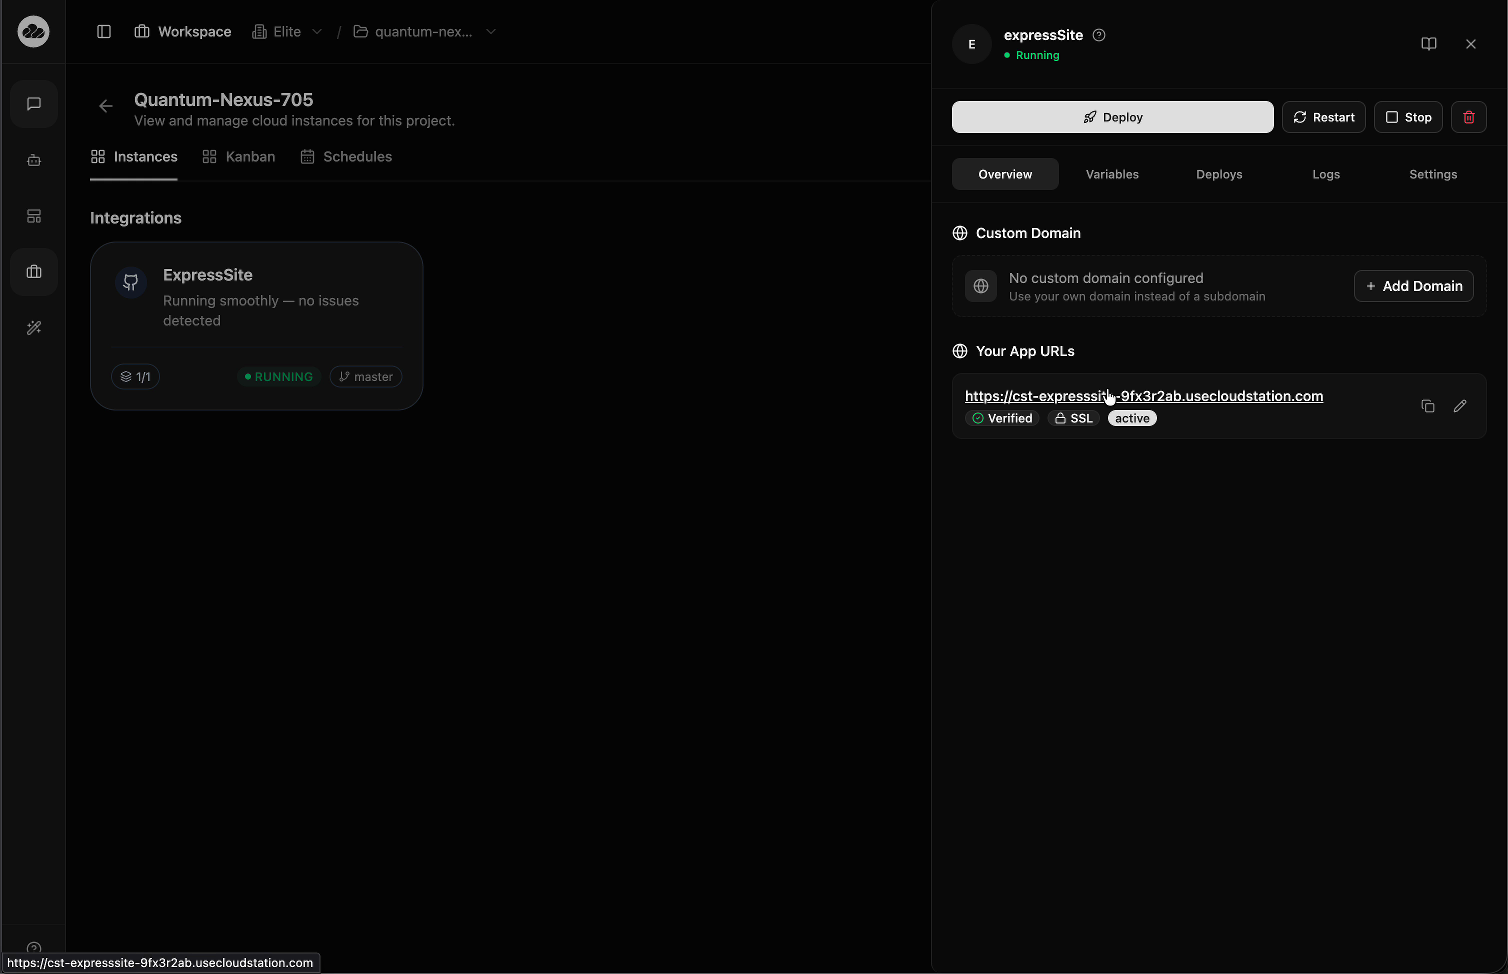
Click the edit icon (pencil) next to your URL to customize the subdomain. Type your preferred subdomain name — the Full Domain Preview updates in real-time to show the final URL. Expand Advanced Settings to configure the protocol (HTTP/TCP), port number, public access toggle, and health check.
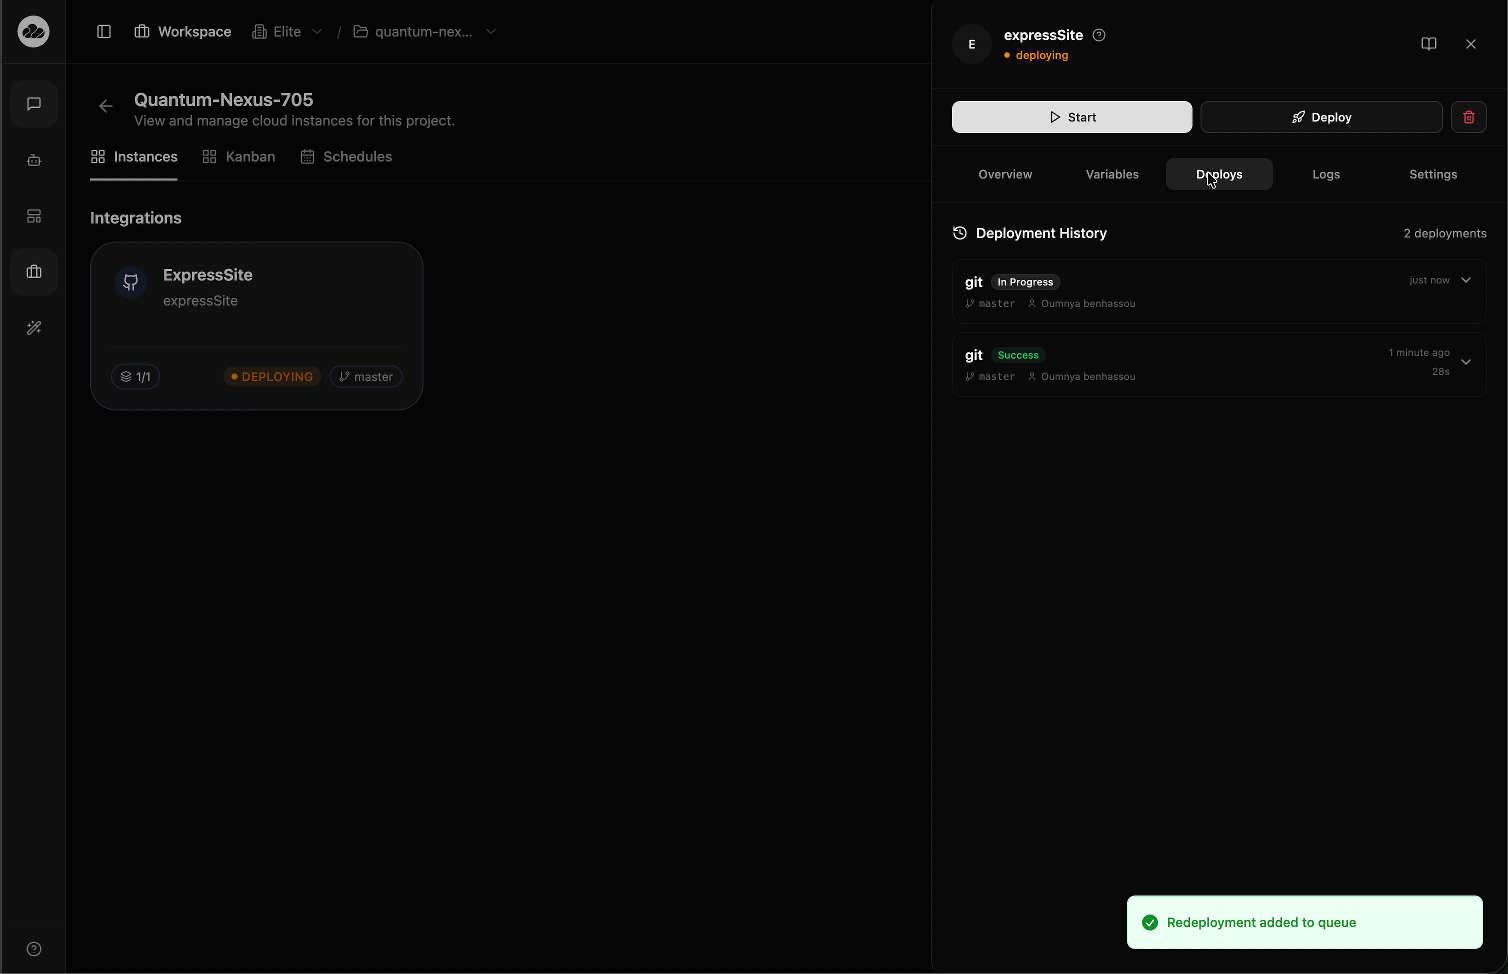
Click Save to apply your custom subdomain. The service will briefly go to PENDING status while the new URL is provisioned, then return to RUNNING with your custom subdomain active.
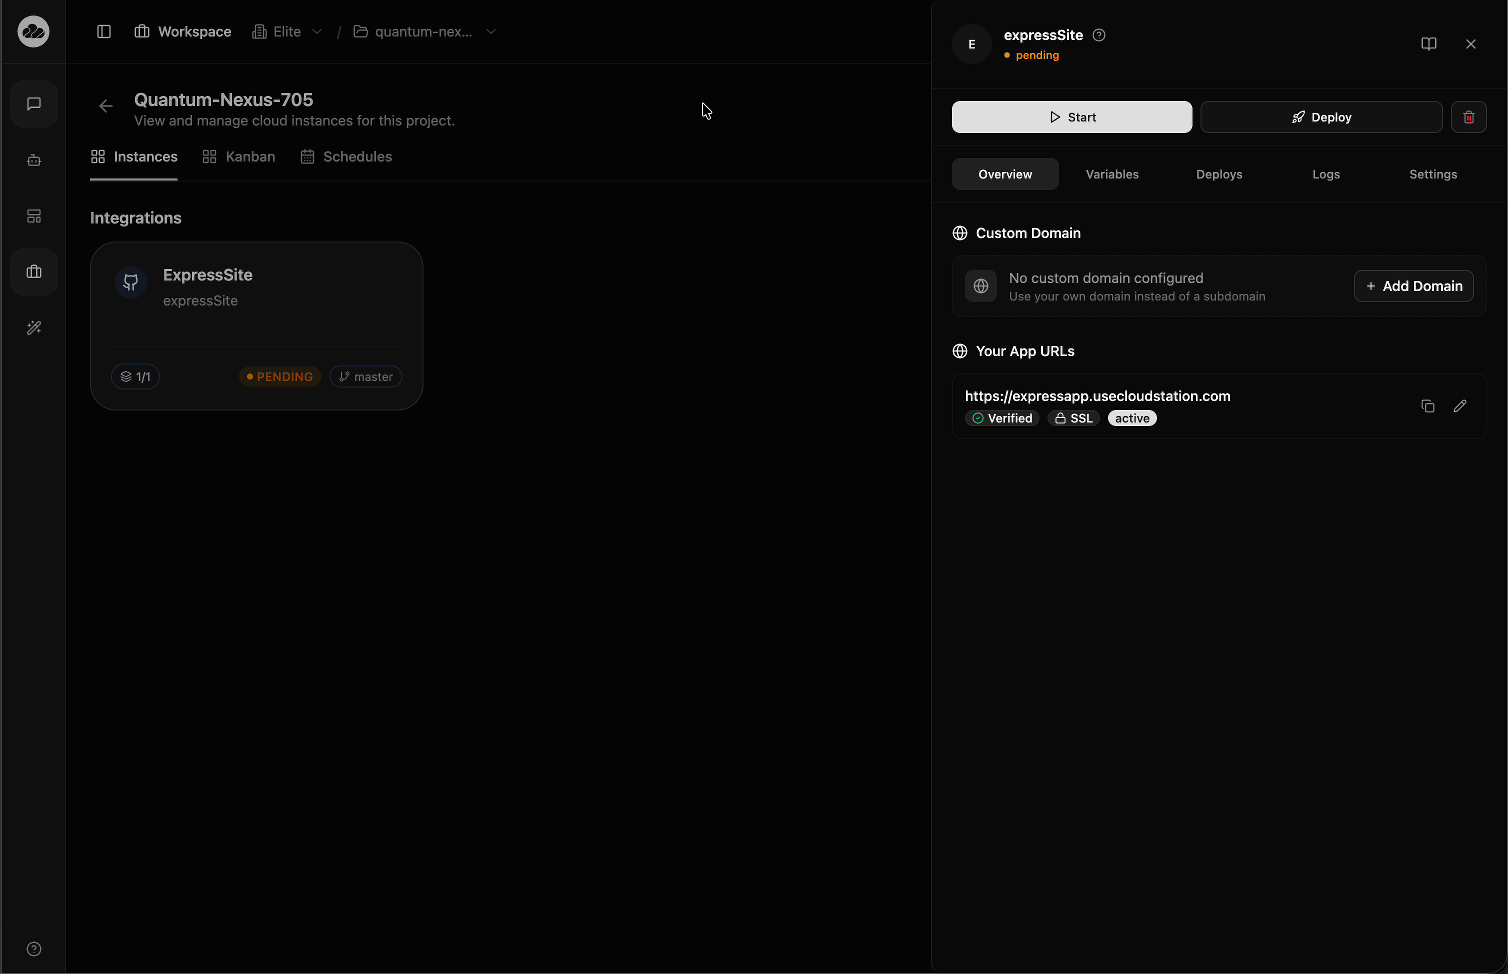
Subdomain changes trigger a redeployment. Your service will be briefly unavailable while the new URL is provisioned (typically under 30 seconds).
Custom Domains
Add your own domain to any public-facing service:
- Open the instance detail panel and go to the Overview tab
- In the Custom Domain section, click + Add Domain
- Enter your domain name
- Update your DNS records as instructed
- CloudStation automatically provisions SSL certificates
SSL certificates are free and automatically renewed. Your services are secure by default.
Environment Variables
Configure your service with environment variables during deployment:
- Database connection strings
- API keys and secrets
- Feature flags
- Service URLs
See Environment Variables for detailed configuration guide.
Advanced Options
Health Checks
Configure custom health checks to ensure your service is running properly:
- HTTP endpoint: Check a specific URL (e.g.,
/health) - TCP connection: Verify port is accepting connections
- Custom command: Run a script inside the container
Restart Policy
Choose what happens when your service stops:
- Always: Automatically restart (recommended for production)
- On failure: Only restart if service crashes
- Never: Manual restart required
Monitoring Deployment
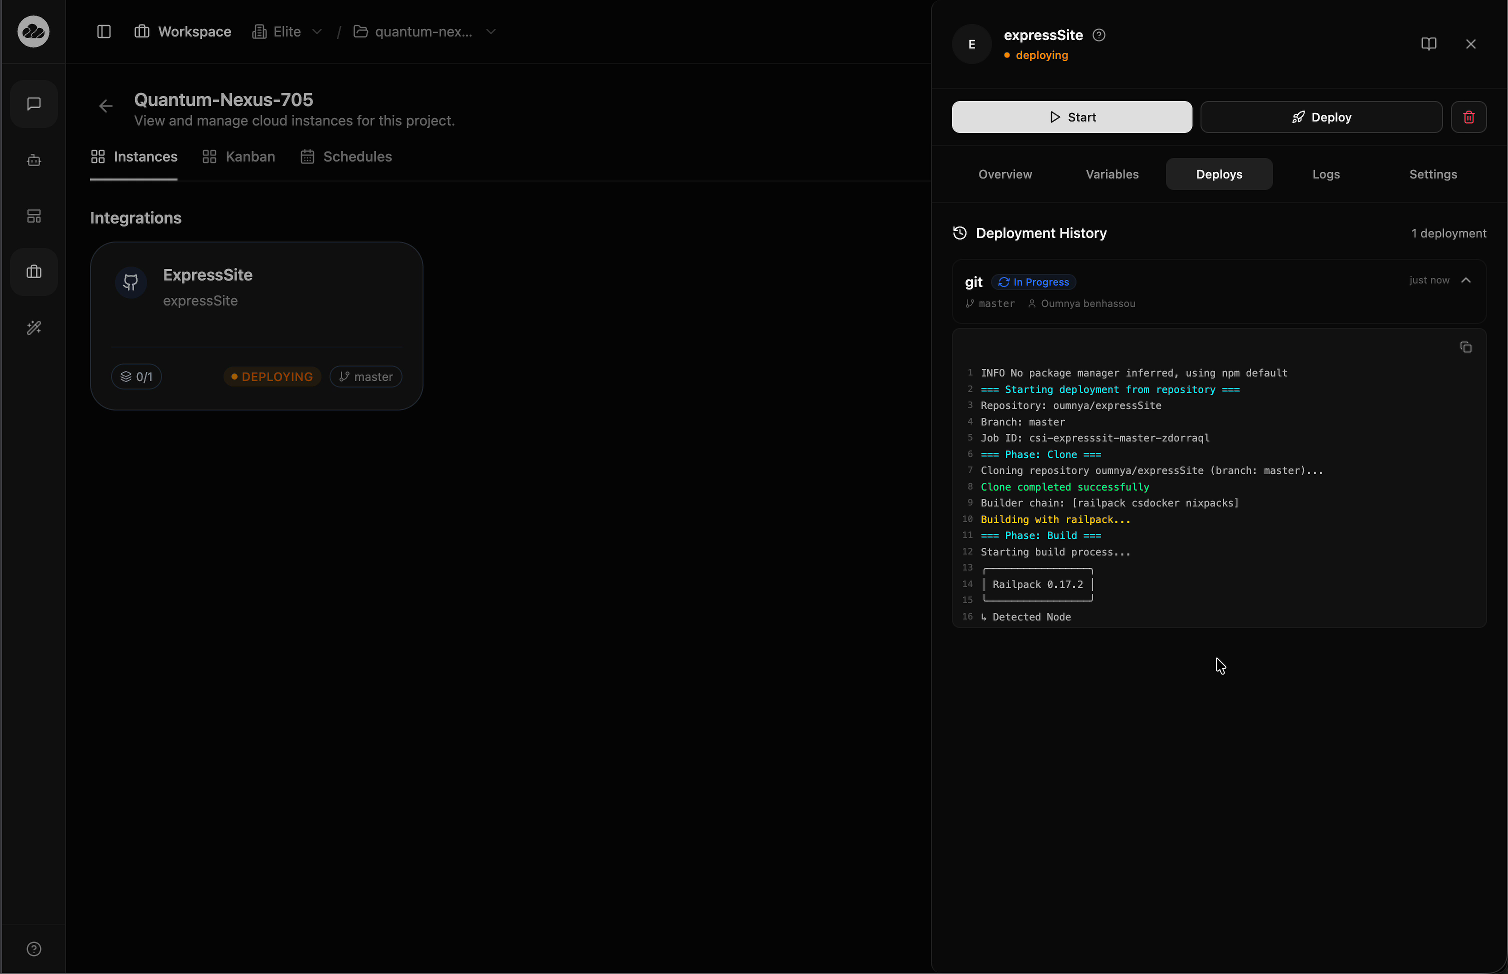
After clicking Deploy, click on your service card to open the detail panel and watch your service come online.
Build Logs
Switch to the Deploys tab to see real-time build logs. For Git deployments, the logs show each phase:
- Clone — Cloning your repository and selected branch
- Build — Building your application with the selected builder (Railpack, Nixpacks, or Docker)
- Deploy — Pushing the built image and starting the container
Instance Settings
The Settings tab shows your service configuration, including service name, deployment location, branch, and auto-deploy toggle. Expand Advanced Settings to view or change the builder, root directory, Dockerfile path, build/start commands, and replica count.
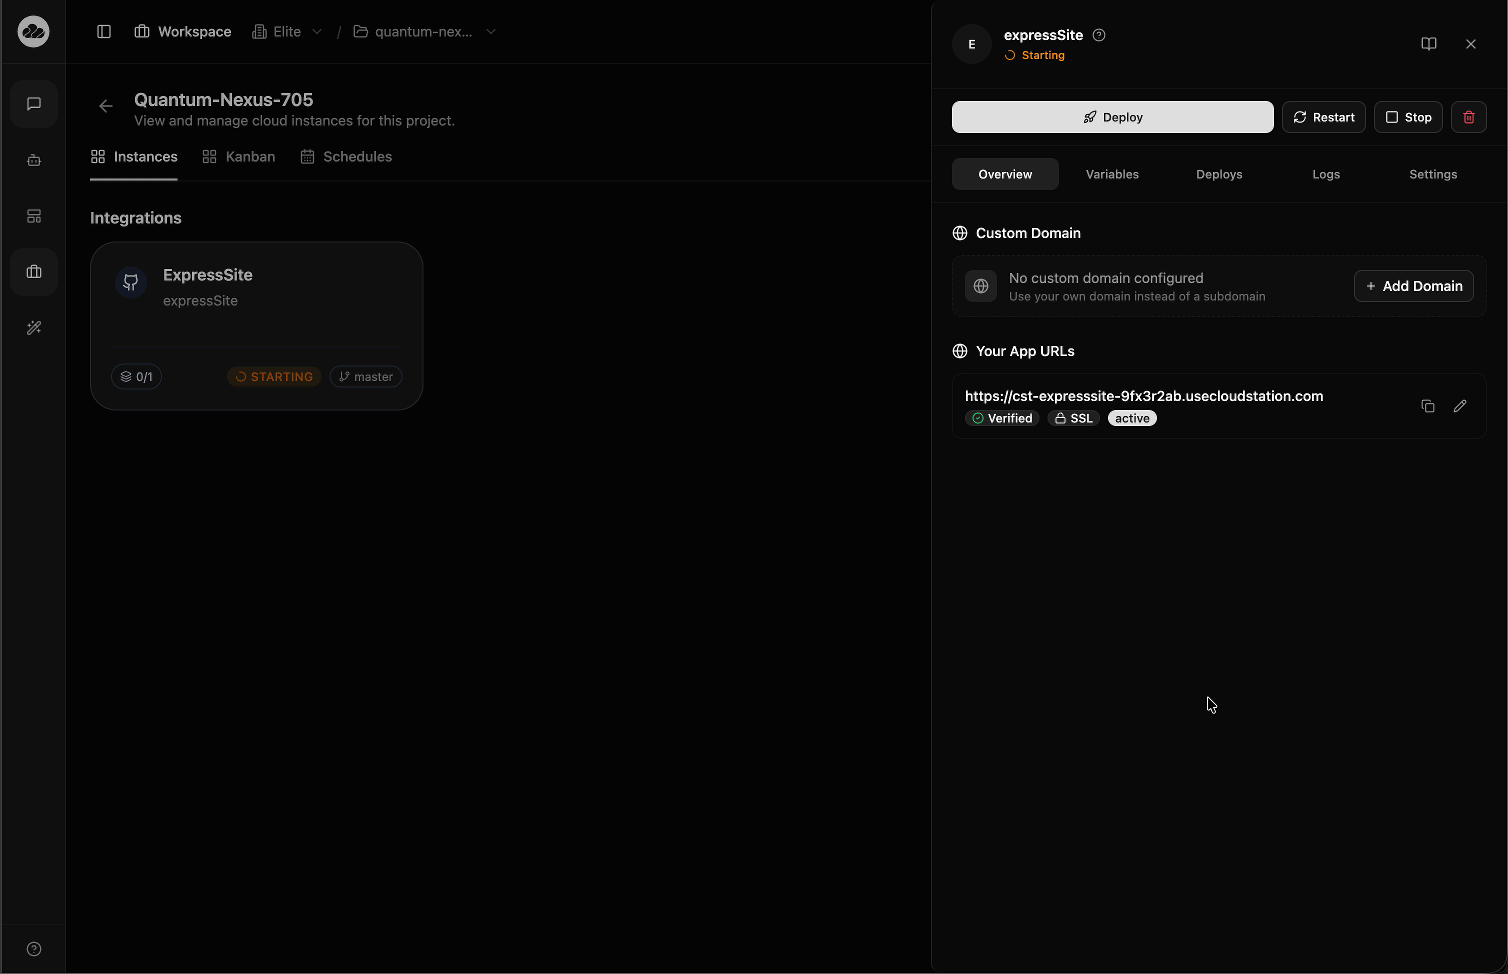
Deployment Status Flow
Watch your service transition through these states:
- DEPLOYING — CloudStation is building and deploying your code
- STARTING — Container is launching
- RUNNING — Service is live and healthy
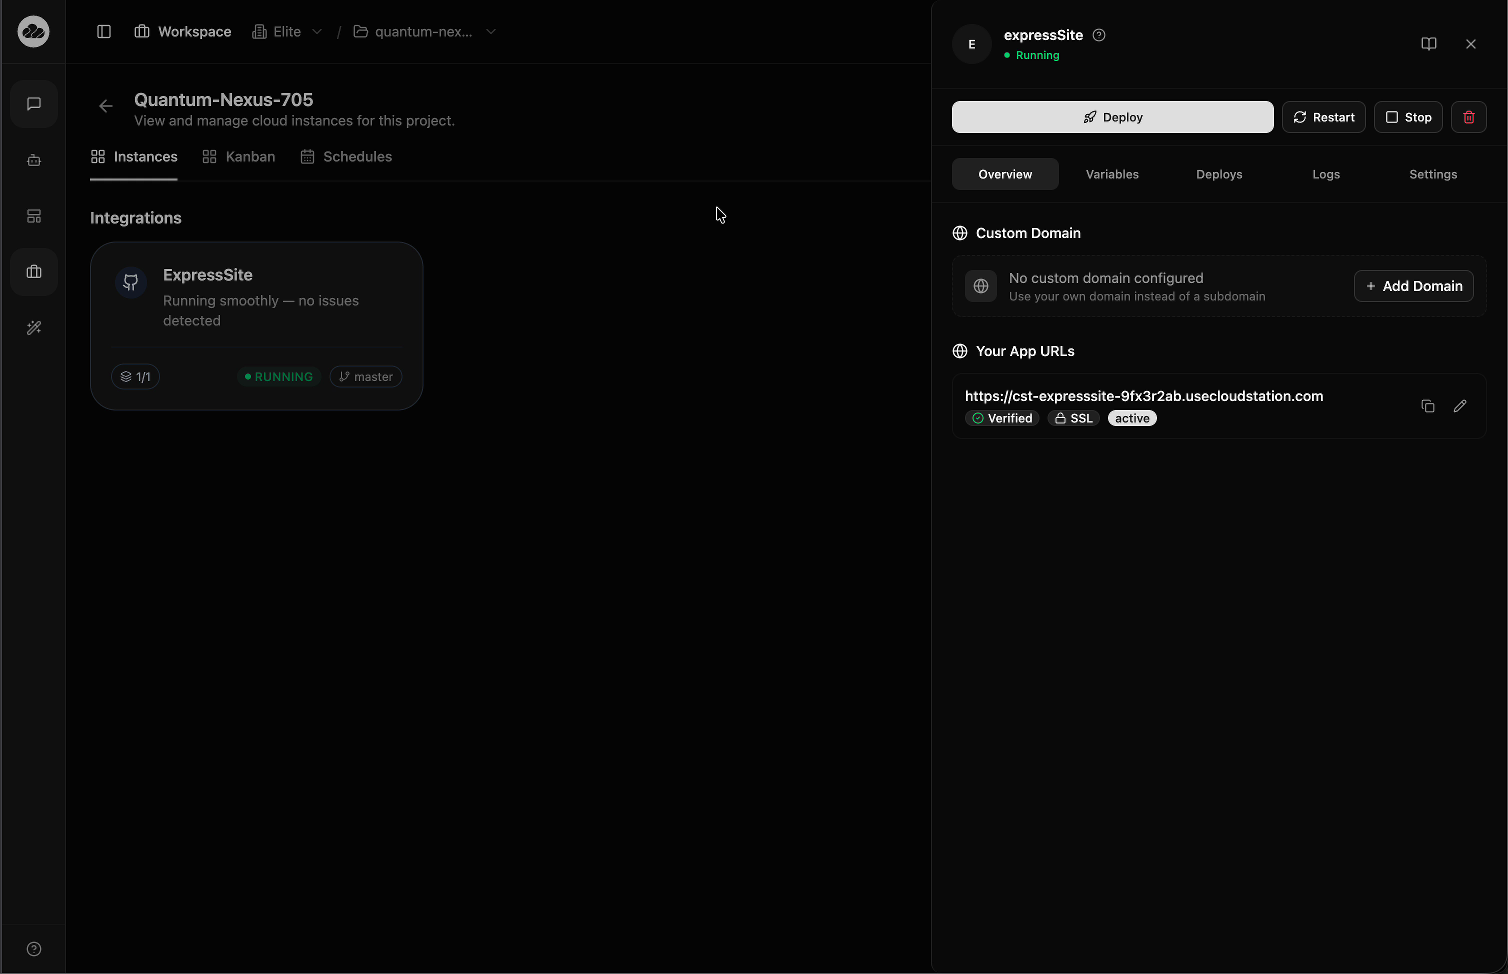
Once your service shows RUNNING with a green dot and "Running smoothly — no issues detected", your app is live and accessible at the assigned URL.

Most deployments complete in under 60 seconds. Complex builds from Git may take a few minutes.
Deployment Troubleshooting
Service Won't Start
Common issues and solutions:
- Insufficient resources: Increase RAM or CPU allocation
- Port conflicts: Check port configuration
- Missing environment variables: Add required configuration
- Image not found: Verify image name and registry access
Build Failures (Git Deployments)
- Check build logs for error messages
- Verify dependencies are specified correctly
- Ensure build commands are correct
- Check for syntax errors in your code
View detailed logs in the instance sidebar. Logs show exactly what's happening during deployment and can help diagnose issues quickly.
Next Steps
- Configure environment variables - Set up your service
- Add persistent storage - Attach volumes for data persistence
- Monitor your service - Set up health checks and alerts
- View your instances - Manage your deployed services